Yarn holder (cat Protection for my wool!)

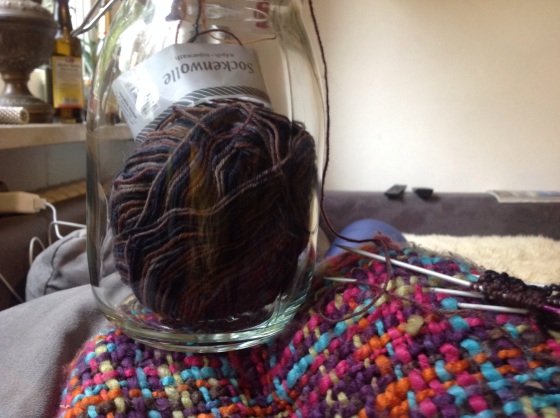
So yesterday my kitty decided to sneak up behind me, grab the whole skein of yarn (with needles) and try and run off with it. Sorry kitty, not allowed!

Needed a quick solution to protect my yarn while I’m using it. I have to put it away when I’m not knitting due to little teeth and sharp claws that just loooove stringy things!

Crocheted a very loose circle, threaded some elastic through the edge and spread it over the opening of a large jar I had. Pull wool through the hole in the centre ( or any other gap) and voila, cat proof wool storage!

I can take off the “cap” using the elastic and place everything including my needles in the jar and close the jar too. So it’s super safe against kitten

IMG_1041.JPG

IMG_1043.JPG

IMG_1044.JPG

Something different

This small project is a little different. I’m sewing something for my mountain bike. Yes, my bike!

I get a lot of dirt and water flying in my face and I needed something to prevent that. I searched the World Wide Web and found these guys commercially available.

IMG_1035.JPG (I don’t own this picture. Source:Google)

They catch all the dirt that would usually fly right into your face. See here….

IMG_1037.JPG (i don’t own this pic. Source: Google)

Unfortunately I couldn’t find one in the size I needed. BUT seeing as it’s just a wide elastic that spans the gap I thought I could make it myself. So I went ahead and made prototype number one….

IMG_1029.JPGa

IMG_1028.JPG

I had really wide elastic (for some high waisted skirt projects that are not even half finished.)
The frayed cuts are there because the fork on my bike won’t allow it to go straight across, the middle section needs to give way.
It’s only trial one. If this works well I will go about making a pretty looking one and update you on it too.

Here are some more bike pics…. My SO was dismantling and pimping his.

IMG_1025.JPG

IMG_1026.JPG

EDIT: it works!!! Time to make the real one.

IMG_1066.JPG

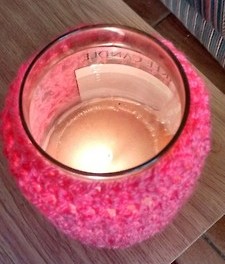
Yankee Candle Cosy

I was a little bit bored one evening so I decided my large Yankee candle needed a sweater! It’s a really quick pattern so it shouldn’t take too long.

tumblr_na7fk8Melx1qjjm0ro1_250


Equipment:

  • 7mm crochet hook
  • DK wool in any colour you like.

***I use American crochet terms in my patterns!***

Pattern:

  1. Make a foundation chain 38 sts long.
  2. DC into 3rd st from end of chain. Continue to end. (35)
  3. Ch 1. SC to end.
  4. Repeat 2 and 3 twice more.
  5. I added shell pattern stitching for the next few rows. I recommend this link for thorough instructions on how to crochet in this stitch.
  6. Repeat 5 twice more.
  7. Repeat 2 and 3 three more times.
  8. Fasten off and use the loose end to sew the sides together.

You can now pull the candle cosy over the top of the candle!

tumblr_na7fk8Melx1qjjm0ro2_1280


This fits on all large Yankee candles, but will also fit any glass jar or candle of a similar size.

It’d be a great personalised addition to any gift (birthdays, housewarming, Christmas, etc)

(Pattern can also be edited to exclude the shell stitching. Another 3 repeats of steps 2 and 3 would do instead).


Hang up everything!!!

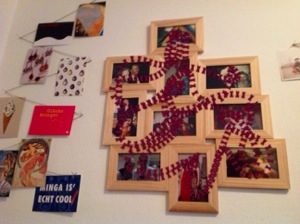
I decided my work space in the office needed to be more cluttered. I had recently bought some small picture frames in Ikea and instead of putting a load of nails in the wall for that many frames I stuck the frames together. I used duct tape to hold it and staples that spanned two frames. Caution: this might not be enough. Mine fell down the first evening because I only had taped it. So on came the staples.
I also added two extra nails, so there’s one holding the topmost frame which is holding everything else, then there’s one under the bottom most frame and one underneath a middle frame on the right hand side. I put them in after it was hanging so I could place them correctly just under the frame, I.e. The frames is on top of those two extra nails.

20140427-184755.jpg

20140427-184147.jpg

I also put in a couple more nails and spanned twine between them. Here I hung up some cool postcards, mementos and a couple photos. Tiny little clothes pegs would be really cute here but I didn’t have any. I used staples! I stapled the middle of the top of my postcard but only let one hook of the staple go through the paper, that way it was half stapled and I could use the other end to hang on the twine.

20140427-184152.jpg

20140427-185236.jpg

A little nerdy

Hubby bought a science set where you could make a digital clock run by potatoes…. Or lemons… Or coca cola… Or ….

Very fun. He knows me too we’ll.

Our sauerkraut that we had for dinner worked perfectly fine too. πŸ™‚

20140310-211120.jpg

Kitchen makeover part two

…of three.

Managed to update the kitchen again with the second part of my makeover plan. One final piece is still missing but that will take some time.

I attached the “cuisine” wall tattoo to the wall, placed a cup board with cup hooks on the wall, hung up my new weighing scale with a small hook and mounted the kitchen roll holder.

20140310-205247.jpg

20140310-205300.jpg

20140310-210843.jpg

This freed up the space under my windowsill so that I have more free workspace for while I’m cooking.

20140310-205342.jpg

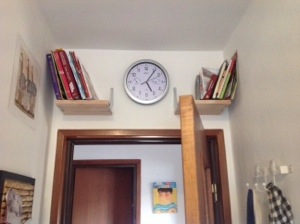
I also put two small bookshelves above the door beside the clock. That way the cookbooks are out of the way and I don’t loose 30cm of my already narrow kitchen. Everything I’ve placed on the wall is 15cm or less which means I don’t hit off it moving around my kitchen but it’s still deep enough to hold things.

20140310-205255.jpg

And a little pro tip from someone with back problems that can’t lift things…. Place potted plant trolleys under the beer crates (or other large heavy boxes) to move them around easily.

20140310-205223.jpg

Kitchen is almost done. Still missing the extra cupboard space I want under the window. I also want to heighten the current work top that’s under the window so that I can work on it, so far it’s only good for getting things out of your way.

Kitchen makeover

I’ve been meaning to do up my kitchen since we moved in last year. Finally got around to doing some of it.

I stuck “blackboard” foil on the wall that I can write on with chalk (amazon) and got shoe cabinets from ikea that now house cat food, dry baking ingredients and the third has plastic bags and sponges in it. Very handy as my kitchen is very narrow and I’d constantly be walking into shelves. These guys are very narrow so they’re not in the way.

20140302-124745.jpg

I also bought “tile foil”, cut out the tile images and stuck them to my own boring white tiles. I now have fancy blue and white decorative tiles. Again, I got the foil on amazon. I have loads of it left so if they ever get dirty or peel off I can just replace them.

20140302-124946.jpg

And last but not least I screwed bars on the walls, hung baskets from them or hooks. Also ikea.

20140302-124955.jpg

20140302-125257.jpg

I still have a kitchen roll holder, a tea towel rack, a cup bar with hooks for cups, a narrow shelf for food, two small shelves for Cook books, a hook for my weighing scale and a whole cabinet with doors for under the window to add to my kitchen to clear it up even further.

Time is in short supply at the moment so it will happen little by little. I don’t mind as long as it is happening.

Oh and a large wall sticker that reads “cuisine” in purple letters. (It’s a private joke that originated from watching a movie called “this must be the place” with Sean Penn. The main character sits in the kitchen and wonders why the interior designer wrote ‘cuisine’ on the wall even though it’s obviously the kitchen.)
Crochet Camera Bag

I have to confess, I don’t know this pattern off-by-heart because I made it up as I went along, but I’ll give you a rough idea!

Note: I use US notation for my patterns.

I used a 4.5 mm crochet hook and double knit yarn. You’ll also need a button and a darning needle for weaving and sewing the button on.

  1. Measure the width of your camera and make the foundation chain that long plus two sts. (I think mine was around 20).
  2. 2 hdcs in first st Β (placing your hook through the third st on the chain) and 1 hdc Β to the second last st, 2 hdcs in the last, then start crocheting in the “bottom” or underside of your foundation chain. Start with 2 hdcs and then 1 hdc to second last st and 2 hdcs in last st. Sl st to join.
  3. Ch 2 and hdc into each st around. Sl st to join. Repeat this until you get to roughly the right size of your camera. (It would look like a bowl or basket-type thing at this stage.
  4. When you’ve gotten to this stage, begin rows of hdcs on one half of you bag only to make the flap. (So if you’ve got a bag 44 sts in the round, maybe make the flap 20 sts.) Repeat rows until you reach your desired length.
  5. To the end of the flap on my camera bag, I added triangle edging. Firstly, because it looked nice and secondly, because it saves on having to make a button hole and you can pop your button through the central triangle. The pattern for that can be found here.
  6. Weave in your ends once you fasten off.
  7. Sew button on. I used a contrasting yarn for this, but it’s not essential.

Et voila!

OLYMPUS DIGITAL CAMERAOLYMPUS DIGITAL CAMERA

Bottle cap coasters

20140225-221307.jpg

I collected bottle caps at barbecues and parties (considering I live in Bavaria, I had quite a few in short time.)
I used nine of them per coaster.
I simply cut thick hemp string into pieces that would span three caps. Stuffed the caps with self hardening clay (bought it on amazon) and made sure the rope/string was well in the clay. I let them dry and voila, finished. Handy if you need coasters for outside things (the edges are too rough to use on good furniture inside) garden parties or barbecues are a good place to show off you alcoholic coasters.

20140225-221950.jpg

The caps will fall off the clay once it’s hard! They won’t last forever. I used a hot glue gun to glue the caps to the clay if they fell off. Worked like a charm.
To be honest you could probably just glue the string in without the clay but I think the clay is good to have to make it all a little heavier, easier to place with one hand and move them about.

20140225-222100.jpg

20140225-222211.jpg